https://supportforums.cisco.com/document/59741/asr9000xr-flexible-vlan-matching-evc-vlan-tag-rewriting-irbbvi-and-defining-l2
http://www.cisco.com/c/en/us/support/docs/routers/asr-9000-series-aggregation-services-routers/116453-technote-ios-xr-l2vpn-00.html
http://www.cisco.com/c/en/us/support/docs/routers/asr-9000-series-aggregation-services-routers/116500-problemsolution-product-00.html
Monday, February 20, 2017

Wednesday, February 15, 2017
Install Adobe reader on Ubuntu 16.04
sudo add-apt-repository "deb http://archive.canonical.com/ precise partner"
sudo apt-get update
sudo apt install adobereader-enu sudo add-apt-repository -r "deb http://archive.canonical.com/ precise partner"
Tuesday, February 14, 2017
How to install a free legal Windows in VirtualBox in Linux
Unfortunately, some people still need Windows for a particular end. For example when they have a navigation device that can only be updated by means of a Windows application....
If this applies to you as well, then you can make use of VirtualBox and a free legal Virtual Machine (VM) with Windows 7, 8.x or 10.
Running such a VM is safe for your Linux: even if a Windows VM would become infected with viruses and malware, it can't do any harm at all to your Linux. That's because a VM runs in a virtualized sandbox, which effectively isolates it from the underlying operating system.
You can achieve this as follows:
1. First install VirtualBox and its extension pack.
2. Reboot the system
3. Now download a free legal VM with Windows 7 Enterprise (IE11 on Win7).
https://developer.microsoft.com/en-us/microsoft-edge/tools/vms/
Preferably not Windows 8.x or 10, because those VM's are less useful (I'll explain that later). You can use this legal VM with Windows 7 for 90 days. Don't forget to activate it within a couple of days, by means of the DOS command slmgr /ato (see the instruction on the wallpaper of Windows 7).
After those 90 days, you can extend the activation five times (unfortunately, these activation extensions aren't possible for the VM's with Windows 8.x and 10!). So you can use the Windows 7 VM legally for 6 x 90 = 540 days in total. The how-to for extending the activation ("re-arm") is written on the wallpaper of Windows 7.
After those 540 days you can simply delete the existing VM and import a new clean VM, which should give you another 540 days. It's therefore useful to keep the downloaded file; after 18 months, that'll save you some time.....
Legal note: the Microsoft license for these VM's states: "You may use the software for testing purposes only". There's no further explanation given of the term "testing purposes" though, and no time limit to your testing other than the maximal activation period. This implies that it's entirely up to you: when you think you're done with testing, you should buy a license or stop using the VM.
4. unzip the download and Launch Oracle VM Virtualbox and select in its panel: File - Import Appliance... Import the .ova file.
5.Start the VM and wait until Windows has completed booting.
6. In the panel of VirtualBox: Devices - Insert Guest Additions CD image...
Now wait; this can take a long time.
Then click on VBoxWindowsAdditions.exe in order to install it.
After the installation of the Guest Additions, you'll be asked to reboot Windows. Do so.
7. After Windows has rebooted, you can add USB devices. First connect them to your computer. Then in the panel of VirtualBox: Devices - USB - click on your device. This should enable Windows to install it. Note: you have to repeat this click on your device, every time you boot the VM. Because with that click, you transfer the device from Linux to Windows.
8. Your Windows 7 VM should now be fully functional.
Important warnings:
- Always shut Windows down by means of its own Start button and not by means of the VirtualBox menu bar.
- Don't use the VM for random web browsing: it's much safer to use Linux for that....
- If you're running it from an SSD: disable defragmentation in Windows, or it'll wear out your SDD.
- Note that transferring a USB storage device (like a USB thumb drive or USB hard drive) to the VM, unmounts that storage device "uncleanly" in the Linux that hosts the VM. Theoretically, this could cause loss of data.
Unfortunately, some people still need Windows for a particular end. For example when they have a navigation device that can only be updated by means of a Windows application....
If this applies to you as well, then you can make use of VirtualBox and a free legal Virtual Machine (VM) with Windows 7, 8.x or 10.
Running such a VM is safe for your Linux: even if a Windows VM would become infected with viruses and malware, it can't do any harm at all to your Linux. That's because a VM runs in a virtualized sandbox, which effectively isolates it from the underlying operating system.
You can achieve this as follows:
1. First install VirtualBox and its extension pack.
2. Reboot the system
3. Now download a free legal VM with Windows 7 Enterprise (IE11 on Win7).
https://developer.microsoft.com/en-us/microsoft-edge/tools/vms/
Preferably not Windows 8.x or 10, because those VM's are less useful (I'll explain that later). You can use this legal VM with Windows 7 for 90 days. Don't forget to activate it within a couple of days, by means of the DOS command slmgr /ato (see the instruction on the wallpaper of Windows 7).
After those 90 days, you can extend the activation five times (unfortunately, these activation extensions aren't possible for the VM's with Windows 8.x and 10!). So you can use the Windows 7 VM legally for 6 x 90 = 540 days in total. The how-to for extending the activation ("re-arm") is written on the wallpaper of Windows 7.
After those 540 days you can simply delete the existing VM and import a new clean VM, which should give you another 540 days. It's therefore useful to keep the downloaded file; after 18 months, that'll save you some time.....
Legal note: the Microsoft license for these VM's states: "You may use the software for testing purposes only". There's no further explanation given of the term "testing purposes" though, and no time limit to your testing other than the maximal activation period. This implies that it's entirely up to you: when you think you're done with testing, you should buy a license or stop using the VM.
4. unzip the download and Launch Oracle VM Virtualbox and select in its panel: File - Import Appliance... Import the .ova file.
5.Start the VM and wait until Windows has completed booting.
6. In the panel of VirtualBox: Devices - Insert Guest Additions CD image...
Now wait; this can take a long time.
Then click on VBoxWindowsAdditions.exe in order to install it.
After the installation of the Guest Additions, you'll be asked to reboot Windows. Do so.
7. After Windows has rebooted, you can add USB devices. First connect them to your computer. Then in the panel of VirtualBox: Devices - USB - click on your device. This should enable Windows to install it. Note: you have to repeat this click on your device, every time you boot the VM. Because with that click, you transfer the device from Linux to Windows.
8. Your Windows 7 VM should now be fully functional.
Important warnings:
- Always shut Windows down by means of its own Start button and not by means of the VirtualBox menu bar.
- Don't use the VM for random web browsing: it's much safer to use Linux for that....
- If you're running it from an SSD: disable defragmentation in Windows, or it'll wear out your SDD.
- Note that transferring a USB storage device (like a USB thumb drive or USB hard drive) to the VM, unmounts that storage device "uncleanly" in the Linux that hosts the VM. Theoretically, this could cause loss of data.
How to install Java and netbeans on Ubuntu
1. Java:
There are so many articles to tell how to install Java on Linux based environment. but some are too complicated . To simple it,
(a) For Java development environment :JDK
(1) sudo apt-get update
(2) sudo apt-get install default-jdk // will install the latest version of Java
(3) verify the version : java -version
(4) set the environment parameters:
export JAVA_HOME=/usr/lib/jvm/java-8-openjdk-amd64
export PATH=$PATH:/usr/lib/jvm/java-8-openjdk-amd64/bin
(it will be a little different when the version is not 8)
verify :
type echo $JAVA_HOME and echo $PATH
(b) for java runtime support JRE
(1) sudo apt-get update
(2) sudo apt-get install default-jre // will install the latest version of Java
(3) verify the version : java -version
2. JavaBeans:
First download it from the page:
https://netbeans.org/
then
chmod +x ./netbeans-8.0.2-php-linux.sh
./netbeans-8.0.2-php-linux.sh
Friday, February 10, 2017
1000BASE-?? , what is means
Ethernet in the First Mile later added 1000BASE-LX10 and -BX10.
The standard specifies a maximum length of 220 meters for 62.5 µm/160 MHz×km multi-mode fiber, 275 m for 62.5 µm/200 MHz×km, 500 m for 50 µm/400MHz×km, and 550 m for 50 µm/500 MHz×km multi-mode fiber.[7][8] In practice, with good quality fiber, optics, and terminations, 1000BASE-SX will usually work over significantly longer distances.[citation needed]
This standard is highly popular for intra-building links in large office buildings, co-location facilities and carrier-neutral Internet exchanges.
Optical power specifications of SX interface: Minimum output power = −9.5 dBm. Minimum receive sensitivity = −17 dBm.
1000BASE-LX is specified to work over a distance of up to 5 km over 10 µm single-mode fiber.
1000BASE-LX can also run over all common types of multi-mode fiber with a maximum segment length of 550 m. For link distances greater than 300 m, the use of a special launch conditioning patch cord may be required.[9] This launches the laser at a precise offset from the center of the fiber which causes it to spread across the diameter of the fiber core, reducing the effect known as differential mode delay which occurs when the laser couples onto only a small number of available modes in multi-mode fiber.
Other, non-standard higher-powered single-strand optics commonly known as "BiDi" (bi-directional) utilize wavelength pairs in the 1490/1550 nm range, and are capable of reaching distances of 20, 40 and 80 km, or greater depending on module cost, fiber path loss, splices, connectors and patch panels. Very long reach BiDi optics may use 1510/1590 nm wavelength pairs.
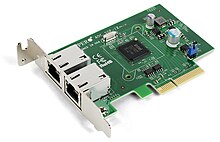 1000BASE-T (also known as IEEE 802.3ab) is a standard for Gigabit Ethernet over copper wiring.
Each 1000BASE-T network segment can be a maximum length of 100 meters (330 feet), and must use Category 5 cable or better (including Cat 5e and Cat 6).
Autonegotiation is a requirement for using 1000BASE-T[14] according to Section 28D.5 Extensions required for Clause40 (1000BASE-T).[15] At least the clock source has to be negotiated, as one endpoint must be master and the other endpoint must be slave.
In a departure from both 10BASE-T and 100BASE-TX, 1000BASE-T uses four lanes over all four cable pairs for simultaneous transmission in both directions through the use of echo cancellation with adaptive equalization and five-level pulse amplitude modulation (PAM-5). The symbol rate is identical to that of 100BASE-TX (125 megabaud) and the noise immunity of the five-level signaling is also identical to that of the three-level signaling in 100BASE-TX, since 1000BASE-T uses four-dimensional trellis coded modulation (TCM) to achieve a 6 dB coding gain across the four pairs.
Since negotiation takes place on only two pairs, if two gigabit devices are connected through a cable with only two pairs, the devices will successfully choose 'gigabit' as the highest common denominator (HCD), but the link will never come up. Most gigabit physical devices have a specific register to diagnose this behaviour. Some drivers offer an "Ethernet@Wirespeed" option where this situation leads to a slower yet functional connection.[16]
The data is transmitted over four copper pairs, eight bits at a time. First, eight bits of data are expanded into four three-bit symbols through a non-trivial scrambling procedure based on a linear feedback shift register; this is similar to what is done in 100BASE-T2, but uses different parameters. The three-bit symbols are then mapped to voltage levels which vary continuously during transmission. An example mapping is as follows:
Automatic MDI/MDI-X Configuration is specified as an optional feature in the 1000BASE-T standard,[17] meaning that straight-through cables will often work between gigabit-capable interfaces. This feature eliminates the need for crossover cables,
making obsolete the uplink/normal ports and manual selector switches
found on many older hubs and switches and greatly reduces installation
errors.
In order to extend and maximize the use of existing Cat-5e and Cat-6 cabling, additional next-generation standards 2.5GBASE-T and 5GBASE-T will operate at 2.5 and 5.0 Gbit/s, respectively, on existing copper infrastructure designed for use with 1000BASE-T.[18] It is based on 10GBASE-T but uses lower signaling frequencies.
example:
| Name | Medium | Specified distance |
|---|---|---|
| 1000BASE‑CX | Shielded balanced copper cable[3] | 25 meters |
| 1000BASE‑KX | Copper backplane | 1 meter |
| 1000BASE‑SX | Multi-mode fiber using 770 to 860 nm wavelength | FDDI (62.5 µm, 160 MHz·km): 220 m OM1 (62.5 µm, 200 MHz·km): 275 m OM2 (50 µm, 500 MHz·km): 550 m[4] |
| 1000BASE‑LX | Multi-mode fiber using 1,270 to 1,355 nm wavelength | 550 meters[5] |
| 1000BASE‑LX | Single-mode fiber using 1,270 to 1,355 nm wavelength | 5 km[5] |
| 1000BASE‑LX10 | Single-mode fiber using 1,260 to 1,360 nm wavelength | 10 km[6] |
| 1000BASE‑EX | Single-mode fiber at 1,310 nm wavelength | ~ 40 km |
| 1000BASE‑ZX | Single-mode fiber at 1,550 nm wavelength | ~ 70 km |
| 1000BASE‑BX10 | Single-mode fiber, single-strand: 1,480 to 1,500 nm downstream, 1,260 to 1,360 nm upstream | 10 km |
| 1000BASE‑T | Twisted-pair cabling (Cat-5, Cat-5e, Cat-6, Cat‑7) | 100 meters |
| 1000BASE-T1 | single, balanced twisted pair cable | 15 meters |
| 1000BASE‑TX | Twisted-pair cabling (Cat-6, Cat‑7) | 100 meters |
1000BASE-X
1000BASE-X is used in industry to refer to Gigabit Ethernet transmission over fiber, where options include 1000BASE-SX, 1000BASE-LX, 1000BASE-LX10, 1000BASE-BX10 or the non-standard -EX and -ZX implementations.1000BASE-CX
1000BASE-CX is an initial standard for Gigabit Ethernet connections with maximum distances of 25 meters using balanced shielded twisted pair and either DE-9 or 8P8C connector (with a pinout different from 1000BASE-T). The short segment length is due to very high signal transmission rate. Although it is still used for specific applications where cabling is done by IT professionals, for instance the IBM BladeCenter uses 1000BASE-CX for the Ethernet connections between the blade servers and the switch modules, 1000BASE-T has succeeded it for general copper wiring use.1000BASE-KX
1000BASE-KX is part of the IEEE 802.3ap standard for Ethernet Operation over Electrical Backplanes. This standard defines one to four lanes of backplane links, one RX and one TX differential pair per lane, at link bandwidth ranging from 100Mbit to 10Gbit per second (from 100BASE-KX to 10GBASE-KX4). The 1000BASE-KX variant uses 1.25 GBd electrical (not optical) signalling speed.1000BASE-SX
1000BASE-SX is a fiber optic Gigabit Ethernet standard for operation over multi-mode fiber using a 770 to 860 nanometer, near infrared (NIR) light wavelength.The standard specifies a maximum length of 220 meters for 62.5 µm/160 MHz×km multi-mode fiber, 275 m for 62.5 µm/200 MHz×km, 500 m for 50 µm/400MHz×km, and 550 m for 50 µm/500 MHz×km multi-mode fiber.[7][8] In practice, with good quality fiber, optics, and terminations, 1000BASE-SX will usually work over significantly longer distances.[citation needed]
This standard is highly popular for intra-building links in large office buildings, co-location facilities and carrier-neutral Internet exchanges.
Optical power specifications of SX interface: Minimum output power = −9.5 dBm. Minimum receive sensitivity = −17 dBm.
1000BASE-LX
1000BASE-LX is a fiber optic Gigabit Ethernet standard specified in IEEE 802.3 Clause 38 which uses a long wavelength laser (1,270–1,355 nm), and a maximum RMS spectral width of 4 nm.1000BASE-LX is specified to work over a distance of up to 5 km over 10 µm single-mode fiber.
1000BASE-LX can also run over all common types of multi-mode fiber with a maximum segment length of 550 m. For link distances greater than 300 m, the use of a special launch conditioning patch cord may be required.[9] This launches the laser at a precise offset from the center of the fiber which causes it to spread across the diameter of the fiber core, reducing the effect known as differential mode delay which occurs when the laser couples onto only a small number of available modes in multi-mode fiber.
1000BASE-LX10
1000BASE-LX10 was standardized six years after the initial gigabit fiber versions as part of the Ethernet in the First Mile task group. It is practically identical to 1000BASE-LX, but achieves longer distances up to 10 km over a pair of single-mode fiber due to higher quality optics. Before it was standardized, 1000BASE-LX10 was essentially already in widespread use by many vendors as a proprietary extension called either 1000BASE-LX/LH or 1000BASE-LH.[10]1000BASE-EX
1000BASE-EX is a non-standard but industry accepted[citation needed] term to refer to Gigabit Ethernet transmission. It is very similar to 1000BASE-LX10 but achieves longer distances up to 40 km over a pair of single-mode fibers due to higher quality optics than a LX10, running on 1310 nm wavelength lasers.[11] It is sometimes referred to as LH (Long Haul), and is easily confused with 1000BASE-LX10 or 1000BASE-ZX because the use of -LX(10), -LH, -EX, and -ZX is ambiguous between vendors. 1000BASE-ZX is a very similar non-standard longer-reach variant that uses 1550 nm wavelength optics.1000BASE-BX10
1000BASE-BX10 is capable of up to 10 km over a single strand of single-mode fiber, with a different wavelength going in each direction. The terminals on each side of the fibre are not equal, as the one transmitting downstream (from the center of the network to the outside) uses the 1490 nm wavelength, and the one transmitting upstream uses the 1310 nm wavelength. This is accomplished using a passive splitter prism inside each transceiver.Other, non-standard higher-powered single-strand optics commonly known as "BiDi" (bi-directional) utilize wavelength pairs in the 1490/1550 nm range, and are capable of reaching distances of 20, 40 and 80 km, or greater depending on module cost, fiber path loss, splices, connectors and patch panels. Very long reach BiDi optics may use 1510/1590 nm wavelength pairs.
1000BASE-ZX
1000BASE-ZX is a non-standard but multi-vendor[citation needed] term to refer to Gigabit Ethernet transmission using 1,550 nm wavelength to achieve distances of at least 70 kilometres (43 miles) over single-mode fiber. Some vendors specify distances up to 120 kilometres (75 miles) over single-mode fiber, sometimes called 1000BASE-EZX. Ranges beyond 80 km are highly dependent upon the path loss of the fiber in use, specifically the attenuation figure in dB per km, the number and quality of connectors/patch panels and splices located between transceivers.[12][13]1000BASE-T

Each 1000BASE-T network segment can be a maximum length of 100 meters (330 feet), and must use Category 5 cable or better (including Cat 5e and Cat 6).
Autonegotiation is a requirement for using 1000BASE-T[14] according to Section 28D.5 Extensions required for Clause40 (1000BASE-T).[15] At least the clock source has to be negotiated, as one endpoint must be master and the other endpoint must be slave.
In a departure from both 10BASE-T and 100BASE-TX, 1000BASE-T uses four lanes over all four cable pairs for simultaneous transmission in both directions through the use of echo cancellation with adaptive equalization and five-level pulse amplitude modulation (PAM-5). The symbol rate is identical to that of 100BASE-TX (125 megabaud) and the noise immunity of the five-level signaling is also identical to that of the three-level signaling in 100BASE-TX, since 1000BASE-T uses four-dimensional trellis coded modulation (TCM) to achieve a 6 dB coding gain across the four pairs.
Since negotiation takes place on only two pairs, if two gigabit devices are connected through a cable with only two pairs, the devices will successfully choose 'gigabit' as the highest common denominator (HCD), but the link will never come up. Most gigabit physical devices have a specific register to diagnose this behaviour. Some drivers offer an "Ethernet@Wirespeed" option where this situation leads to a slower yet functional connection.[16]
The data is transmitted over four copper pairs, eight bits at a time. First, eight bits of data are expanded into four three-bit symbols through a non-trivial scrambling procedure based on a linear feedback shift register; this is similar to what is done in 100BASE-T2, but uses different parameters. The three-bit symbols are then mapped to voltage levels which vary continuously during transmission. An example mapping is as follows:
| Symbol | 000 | 001 | 010 | 011 | 100 | 101 | 110 | 111 |
|---|---|---|---|---|---|---|---|---|
| Line signal level | 0 | +1 | +2 | −1 | 0 | +1 | −2 | −1 |
In order to extend and maximize the use of existing Cat-5e and Cat-6 cabling, additional next-generation standards 2.5GBASE-T and 5GBASE-T will operate at 2.5 and 5.0 Gbit/s, respectively, on existing copper infrastructure designed for use with 1000BASE-T.[18] It is based on 10GBASE-T but uses lower signaling frequencies.
1000BASE-T1
IEEE 802.3 standardized 1000BASE-T1 in IEEE Std 802.3bp-2016.[19] It defines Gigabit Ethernet over a single twisted pair for automotive and industrial applications. It includes cable specifications for 15 meters or 40 meters reach.1000BASE-TX
The Telecommunications Industry Association (TIA) created and promoted a standard similar to 1000BASE-T that was simpler to implement, calling it 1000BASE-TX (TIA/EIA-854).[20] The simplified design would have, in theory, reduced the cost of the required electronics by only using two unidirectional pairs (one pair TX, one RX) instead of four bidirectional pairs. However, this solution has been a commercial failure, likely due to the required Category 6 cabling and the rapidly falling cost of 1000BASE-T products.example:
Details
Allgemein
GerätetypSFP (Mini-GBIC)-Transceiver-Modul
FormfaktorPlug-in-Modul
Netzwerk
AnschlusstechnikVerkabelt
Verdrahtungstyp1000Base-SX
Data Link ProtocolGigabit Ethernet
Datenübertragungsrate1 Gbps
Optische Wellenlänge850 nm
Maximaler Übertragungsbereich1 km
LeistungsmerkmaleAustausch von Hot-Swap-Modulen, Unterstützung von Digital Optical Monitoring (DOM)
ProduktzertifizierungenIEEE 802.3z, IEEE 802.3ah
Erweiterung / Konnektivität
Schnittstellen1 x Ethernet 1000Base-SX - LC/PC multi-mode x 2
Kompatible Steckplätze1 x SFP (mini-GBIC)
Tuesday, February 7, 2017
How To Install Linux, Apache, MySQL, PHP (LAMP) stack on Ubuntu 16.04
from:
https://www.digitalocean.com/community/tutorials/how-to-install-linux-apache-mysql-php-lamp-stack-on-ubuntu-16-04#prerequisites
Introduction
A "LAMP" stack is a group of open source software that is typically installed together to enable a server to host dynamic websites and web apps. This term is actually an acronym which represents the Linux operating system, with the Apache web server. The site data is stored in a MySQL database, and dynamic content is processed by PHP.In this guide, we'll get a LAMP stack installed on an Ubuntu 16.04 Droplet. Ubuntu will fulfill our first requirement: a Linux operating system.
Prerequisites
Before you begin with this guide, you should have a separate, non-root user account withsudo privileges set up on your server. You can learn how to do this by completing steps 1-4 in the initial server setup for Ubuntu 16.04.Step 1: Install Apache and Allow in Firewall
The Apache web server is among the most popular web servers in the world. It's well-documented, and has been in wide use for much of the history of the web, which makes it a great default choice for hosting a website.We can install Apache easily using Ubuntu's package manager,
apt.
A package manager allows us to install most software pain-free from a
repository maintained by Ubuntu. You can learn more about how to use apt here.For our purposes, we can get started by typing these commands:
- sudo apt-get update
- sudo apt-get install apache2
sudo command, these operations get
executed with root privileges. It will ask you for your regular user's
password to verify your intentions.Once you've entered your password,
apt will tell you which packages it plans to install and how much extra disk space they'll take up. Press Y and hit Enter to continue, and the installation will proceed.Set Global ServerName to Suppress Syntax Warnings
Next, we will add a single line to the/etc/apache2/apache2.conf file to suppress a warning message. While harmless, if you do not set ServerName globally, you will receive the following warning when checking your Apache configuration for syntax errors:
- sudo apache2ctl configtest
Output
AH00558: apache2: Could not reliably determine the server's fully qualified domain name, using 127.0.1.1. Set the 'ServerName' directive globally to suppress this message
Syntax OK
- sudo nano /etc/apache2/apache2.conf
ServerName
directive, pointing to your primary domain name. If you do not have a
domain name associated with your server, you can use your server's
public IP address:
Note
If you don't know your server's IP address, skip down to the section on how to find your server's public IP address to find it.
/etc/apache2/apache2.conf
. . .
ServerName server_domain_or_IP
Next, check for syntax errors by typing:
- sudo apache2ctl configtest
ServerName directive, all you should see is:
Output
Syntax OK
- sudo systemctl restart apache2
Adjust the Firewall to Allow Web Traffic
Next, assuming that you have followed the initial server setup instructions to enable the UFW firewall, make sure that your firewall allows HTTP and HTTPS traffic. You can make sure that UFW has an application profile for Apache like so:
- sudo ufw app list
Output
Available applications:
  Apache
  Apache Full
  Apache Secure
  OpenSSH
Apache Full profile, it should show that it enables traffic to ports 80 and 443:
- sudo ufw app info "Apache Full"
Output
Profile: Apache Full
Title: Web Server (HTTP,HTTPS)
Description: Apache v2 is the next generation of the omnipresent Apache web
server.

Ports:
  80,443/tcp
- sudo ufw allow in "Apache Full"
http://your_server_IP_address

If you see this page, then your web server is now correctly installed and accessible through your firewall.
How To Find your Server's Public IP Address
If you do not know what your server's public IP address is, there are a number of ways you can find it. Usually, this is the address you use to connect to your server through SSH.From the command line, you can find this a few ways. First, you can use the
iproute2 tools to get your address by typing this:
- ip addr show eth0 | grep inet | awk '{ print $2; }' | sed 's/\/.*$//'
An alternative method is to use the
curl utility to contact an outside party to tell you how it sees your server. You can do this by asking a specific server what your IP address is:
- sudo apt-get install curl
- curl http://icanhazip.com
Step 2: Install MySQL
Now that we have our web server up and running, it is time to install MySQL. MySQL is a database management system. Basically, it will organize and provide access to databases where our site can store information.Again, we can use
apt to acquire and install our
software. This time, we'll also install some other "helper" packages
that will assist us in getting our components to communicate with each
other:
- sudo apt-get install mysql-server
sudo apt-get update
prior to the command. This is because we recently ran it in the
commands above to install Apache. The package index on our computer
should already be up-to-date.Again, you will be shown a list of the packages that will be installed, along with the amount of disk space they'll take up. Enter Y to continue.
During the installation, your server will ask you to select and confirm a password for the MySQL "root" user. This is an administrative account in MySQL that has increased privileges. Think of it as being similar to the root account for the server itself (the one you are configuring now is a MySQL-specific account, however). Make sure this is a strong, unique password, and do not leave it blank.
When the installation is complete, we want to run a simple security script that will remove some dangerous defaults and lock down access to our database system a little bit. Start the interactive script by running:
- sudo mysql_secure_installation
VALIDATE PASSWORD PLUGIN.Warning: Enabling this feature is something of a judgment call. If enabled, passwords which don't match the specified criteria will be rejected by MySQL with an error. This will cause issues if you use a weak password in conjunction with software which automatically configures MySQL user credentials, such as the Ubuntu packages for phpMyAdmin. It is safe to leave validation disabled, but you should always use strong, unique passwords for database credentials.
Answer y for yes, or anything else to continue without enabling.
VALIDATE PASSWORD PLUGIN can be used to test passwords
and improve security. It checks the strength of password
and allows the users to set only those passwords which are
secure enough. Would you like to setup VALIDATE PASSWORD plugin?

Press y|Y for Yes, any other key for No:
There are three levels of password validation policy:

LOW    Length >= 8
MEDIUM Length >= 8, numeric, mixed case, and special characters
STRONG Length >= 8, numeric, mixed case, special characters and dictionary                  file

Please enter 0 = LOW, 1 = MEDIUM and 2 = STRONG: 1
Using existing password for root.

Estimated strength of the password: 100
Change the password for root ? ((Press y|Y for Yes, any other key for No) : n
At this point, your database system is now set up and we can move on.
Step 3: Install PHP
PHP is the component of our setup that will process code to display dynamic content. It can run scripts, connect to our MySQL databases to get information, and hand the processed content over to our web server to display.We can once again leverage the
apt system to install our
components. We're going to include some helper packages as well, so
that PHP code can run under the Apache server and talk to our MySQL
database:
- sudo apt-get install php libapache2-mod-php php-mcrypt php-mysql
In most cases, we'll want to modify the way that Apache serves files when a directory is requested. Currently, if a user requests a directory from the server, Apache will first look for a file called
index.html. We want to tell our web server to prefer PHP files, so we'll make Apache look for an index.php file first.To do this, type this command to open the
dir.conf file in a text editor with root privileges:
- sudo nano /etc/apache2/mods-enabled/dir.conf
/etc/apache2/mods-enabled/dir.conf
<IfModule mod_dir.c>
    DirectoryIndex index.html index.cgi index.pl index.php index.xhtml index.htm
</IfModule>
DirectoryIndex specification, like this:
/etc/apache2/mods-enabled/dir.conf
<IfModule mod_dir.c>
    DirectoryIndex index.php index.html index.cgi index.pl index.xhtml index.htm
</IfModule>
After this, we need to restart the Apache web server in order for our changes to be recognized. You can do this by typing this:
- sudo systemctl restart apache2
apache2 service using systemctl:
- sudo systemctl status apache2
Sample Output
● apache2.service - LSB: Apache2 web server
   Loaded: loaded (/etc/init.d/apache2; bad; vendor preset: enabled)
  Drop-In: /lib/systemd/system/apache2.service.d
           └─apache2-systemd.conf
   Active: active (running) since Wed 2016-04-13 14:28:43 EDT; 45s ago
     Docs: man:systemd-sysv-generator(8)
  Process: 13581 ExecStop=/etc/init.d/apache2 stop (code=exited, status=0/SUCCESS)
  Process: 13605 ExecStart=/etc/init.d/apache2 start (code=exited, status=0/SUCCESS)
    Tasks: 6 (limit: 512)
   CGroup: /system.slice/apache2.service
           ├─13623 /usr/sbin/apache2 -k start
           ├─13626 /usr/sbin/apache2 -k start
           ├─13627 /usr/sbin/apache2 -k start
           ├─13628 /usr/sbin/apache2 -k start
           ├─13629 /usr/sbin/apache2 -k start
           └─13630 /usr/sbin/apache2 -k start

Apr 13 14:28:42 ubuntu-16-lamp systemd[1]: Stopped LSB: Apache2 web server.
Apr 13 14:28:42 ubuntu-16-lamp systemd[1]: Starting LSB: Apache2 web server...
Apr 13 14:28:42 ubuntu-16-lamp apache2[13605]:  * Starting Apache httpd web server apache2
Apr 13 14:28:42 ubuntu-16-lamp apache2[13605]: AH00558: apache2: Could not reliably determine the server's fully qualified domain name, using 127.0.1.1. Set the 'ServerNam
Apr 13 14:28:43 ubuntu-16-lamp apache2[13605]:  *
Apr 13 14:28:43 ubuntu-16-lamp systemd[1]: Started LSB: Apache2 web server.
Install PHP Modules
To enhance the functionality of PHP, we can optionally install some additional modules.To see the available options for PHP modules and libraries, you can pipe the results of
apt-cache search into less, a pager which lets you scroll through the output of other commands:
- apt-cache search php- | less
The results are all optional components that you can install. It will give you a short description for each:
libnet-libidn-perl - Perl bindings for GNU Libidn
php-all-dev - package depending on all supported PHP development packages
php-cgi - server-side, HTML-embedded scripting language (CGI binary) (default)
php-cli - command-line interpreter for the PHP scripting language (default)
php-common - Common files for PHP packages
php-curl - CURL module for PHP [default]
php-dev - Files for PHP module development (default)
php-gd - GD module for PHP [default]
php-gmp - GMP module for PHP [default]
…
:
- apt-cache show package_name
Description-en which will have a longer explanation of the functionality that the module provides.For example, to find out what the
php-cli module does, we could type this:
- apt-cache show php-cli
Output
…
Description-en: command-line interpreter for the PHP scripting language (default)
 This package provides the /usr/bin/php command interpreter, useful for
 testing PHP scripts from a shell or performing general shell scripting tasks.
 .
 PHP (recursive acronym for PHP: Hypertext Preprocessor) is a widely-used
 open source general-purpose scripting language that is especially suited
 for web development and can be embedded into HTML.
 .
 This package is a dependency package, which depends on Debian's default
 PHP version (currently 7.0).
…
apt-get install command like we have been doing for our other software.If we decided that
php-cli is something that we need, we could type:
- sudo apt-get install php-cli
apt-get install command, like this:
- sudo apt-get install package1 package2 ...
Step 4: Test PHP Processing on your Web Server
In order to test that our system is configured properly for PHP, we can create a very basic PHP script.We will call this script
info.php. In order for Apache
to find the file and serve it correctly, it must be saved to a very
specific directory, which is called the "web root".In Ubuntu 14.04, this directory is located at
/var/www/html/. We can create the file at that location by typing:
- sudo nano /var/www/html/info.php
info.php
<?php
phpinfo();
Now we can test whether our web server can correctly display content generated by a PHP script. To try this out, we just have to visit this page in our web browser. You'll need your server's public IP address again.
The address you want to visit will be:
http://your_server_IP_address/info.php
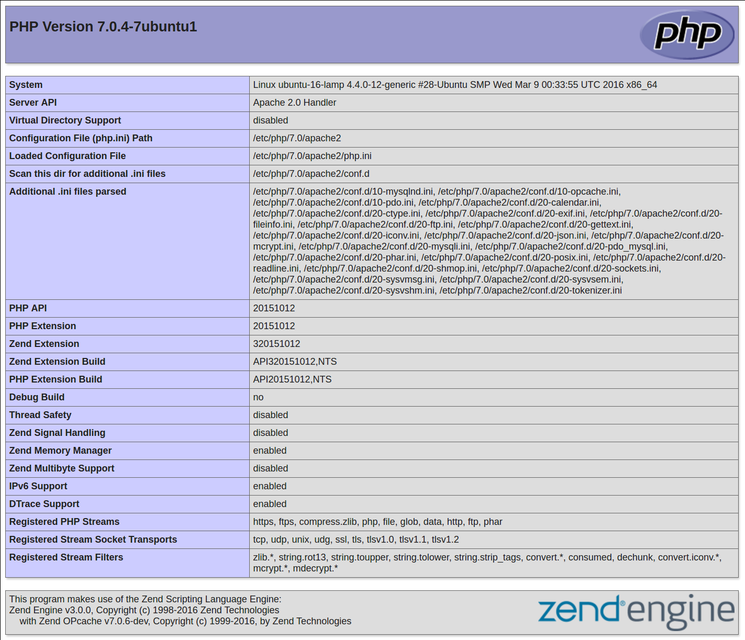
This page basically gives you information about your server from the perspective of PHP. It is useful for debugging and to ensure that your settings are being applied correctly.
If this was successful, then your PHP is working as expected.
You probably want to remove this file after this test because it could actually give information about your server to unauthorized users. To do this, you can type this:
- sudo rm /var/www/html/info.php
Conclusion
Now that you have a LAMP stack installed, you have many choices for what to do next. Basically, you've installed a platform that will allow you to install most kinds of websites and web software on your server.As an immediate next step, you should ensure that connections to your web server are secured, by serving them via HTTPS. The easiest option here is to use Let's Encrypt to secure your site with a free TLS/SSL certificate.
Some other popular options are:
- Install Wordpress the most popular content management system on the internet.
- Set Up PHPMyAdmin to help manage your MySQL databases from web browser.
- Learn more about MySQL to manage your databases.
- Learn how to use SFTP to transfer files to and from your server.
What is LAMP
The first time I saw LAMP, totally get confused. Is it a device for giving light. A light?
Of course, it is an Abbreviation , Abkürzungen.
So it is Linux , Apache, MySQL, PHP or Python, which is the open source software combination for web service or server.
Subscribe to:
Posts (Atom)